
Self-installing your internet can sound difficult at first. Like, three hours of an afternoon wasted, smashed holes in the wall, sparks flying across your living room, and still no internet difficult. After all, there’s a reason internet companies have professional technicians who install internet connections for customers.
But the truth is that setting up your own internet isn’t that hard (well … unless it’s satellite or fixed wireless internet). In fact, self-installing is a relatively easy way to save quite a bit of money on your first internet bill, especially since internet installation fees cost around $90 on average. Plus, most internet providers offer self-installation options if you ask when you sign up for service.
While the specific steps for each internet provider varies slightly, the process is relatively similar for each connection type. In this self-installation guide, we’ll let you know what you need and give you step-by-step instructions on how to self-install your internet for all of the major connection types. You’ll walk away from this guide learning about the following topics:
- How to Self-Install Cable Internet
- How to Self-Install Fiber Internet
- How to Self-Install DSL Internet
- How to Self-Install 5G Home Internet
- Self-Installing Fixed Wireless and Satellite Internet
- Frequently Asked Questions About Self-Installing Internet
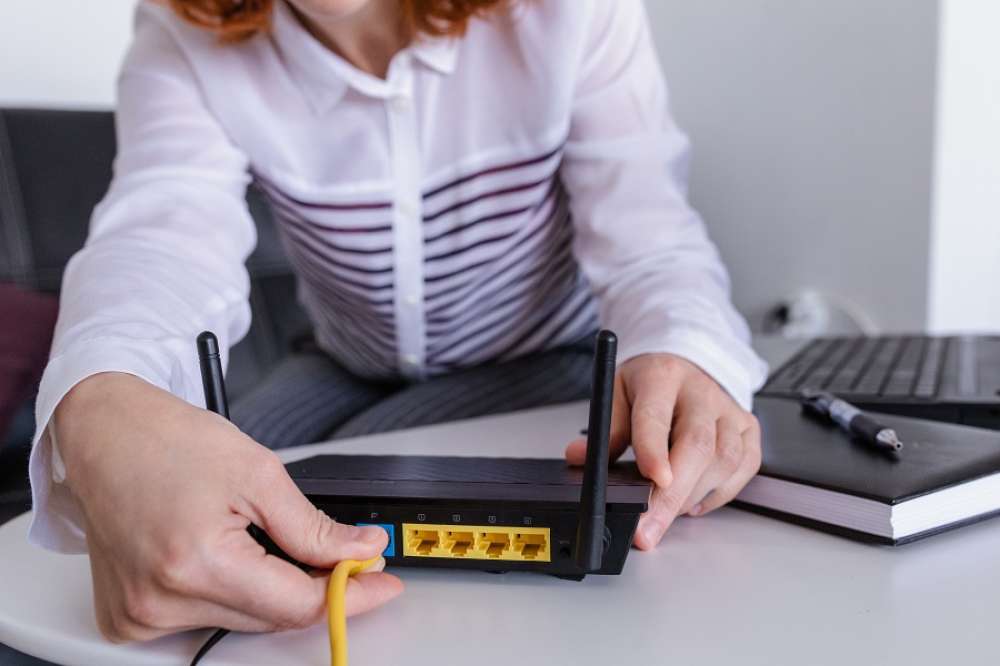
How to Self-Install Cable Internet
Cable internet uses the same infrastructure as cable TV to give people their internet. In this way, it’s a bit like DSL internet, which runs through telephone lines. The biggest differences are that, one, cable doesn’t have quite the same coverage, and, two, it can be considerably faster than DSL. In some cases, cable internet speeds can even come close to what you get with fiber.
Self-installing cable internet is relatively easy if you already have a cable jack installed in your home. It gets a bit complicated if you want to use a cable TV box with your internet connection on the same cable jack, but don’t worry, we cover that later on. If you don’t have the requisite wiring or cable jacks in your home, then you’ll need a technician to come by for a visit.
|
Self-Installation Insights: While there isn’t really a “self-install fee,” some internet providers will charge you shipping and handling for your self-install kit, which can cost around $9.99. Sidestep this savings loss by either picking up the self-install kit yourself or installing your own preapproved modem. |
By self-installing your cable internet, you could save $100 or more in technician fees. With that level of savings, it’s kind of like getting your first couple of months of cable internet for free. Many cable internet providers offer self-installation, including Cox, Spectrum, Xfinity, and Suddenlink.
What You’ll Need to Self-Install Your Cable Internet
- Cable modem: This piece of equipment translates the signal sent through coaxial cables into internet that your devices can understand. Many cable modems come as a router and modem combination, meaning they can provide Wi-Fi and multidevice connections.
- Coaxial cable: This cable is made of a hard plastic and has a hexagonal head on each side with a copper wire sticking out. You’ll need this wire to connect your cable modem to the cable jack in your wall. Note, you might need three of these wires if you’re connecting your cable modem with the same cable jack that you’re already using for your cable TV.
- Power cord: The internet needs electricity after all.
- Power outlet: Make sure that you have an outlet nearby or an extension handy.
- Cable splitter (optional): This device allows you to split one cable jack into two different, independent cables. You’ll need this device if you’re going to plug your cable modem into the same cable jack as your cable TV box.
- Ethernet cable (optional): You’ll need this cable if you want to connect your computer or laptop directly to your cable modem.
- Computer, smartphone, or tablet: One of these devices is necessary to register with your cable internet provider and test the internet connection.
Instructions for Self-Installing Cable Internet
If you’re using the same cable jack as your pre-existing cable TV, follow these steps:
- Turn off your cable TV box and unplug the power cord.
- Disconnect your cable TV box’s coaxial cable from the cable jack on the wall.
- Connect one end of a coaxial cable to the IN or Input port on your cable splitter and the other end to the cable jack.
- Connect another coaxial cable from your cable TV box to one of the OUT or Output ports on your cable splitter.
- Use the remaining coaxial cable to connect your cable modem to the other OUT or Output port on the cable splitter. In total, there should be three coaxial cables.
- Plug your cable TV box’s power cord back into the power outlet.
- Plug your cable modem’s power cord into the modem and the power outlet.
- Wait until the lights on your cable modem stop blinking and turn solid. If they don’t turn solid after more than five minutes, try unplugging and replugging the cable modem before calling the cable internet provider.
- Find your cable internet Wi-Fi network name and password on the side or bottom of the cable modem.
- Connect to your cable internet’s Wi-Fi network with your computer, tablet, or smartphone. Alternatively, you can connect an Ethernet cable from the cable modem to a wired device to establish a connection as well.
- Open your preferred browser, and an automatic registration page should pop up immediately. If it doesn’t, refer to any included documentation on how to navigate to this website location. Finish your registration, and your cable internet should now be fully activated.
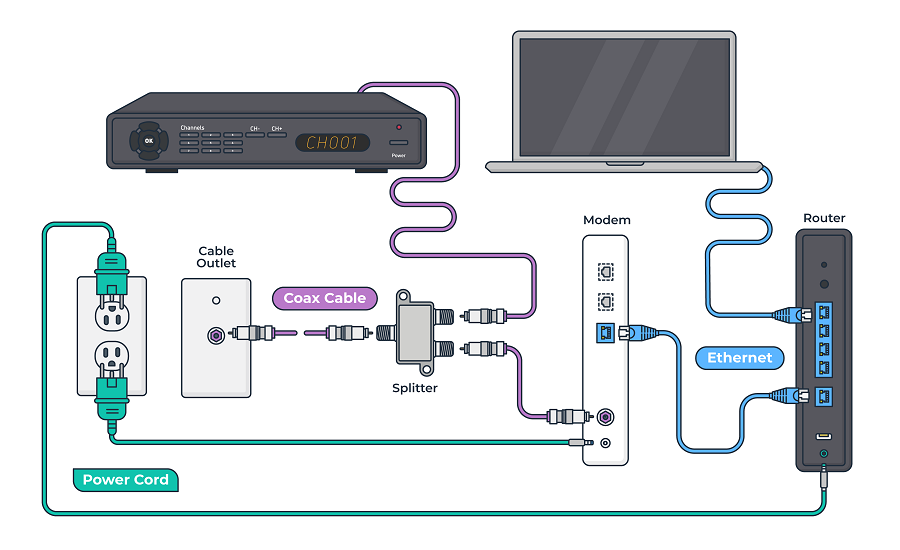
If you are NOT using the same cable jack as your cable TV, follow these instructions:
- Connect your cable modem and preferred cable jack by screwing each end of a coaxial cable into each item.
- Connect the included power cord to the cable modem and plug it into a nearby power outlet.
- Wait five minutes for the lights on the cable modem to stop blinking and turn solid. If these lights don’t turn solid, try unplugging the cable modem and plugging it back in to try again. If the problem persists, you may need to contact your cable internet provider.
- Locate the name and password of the cable modem’s Wi-Fi network on the side or bottom of the device.
- Use your computer, tablet, or smartphone to connect to your cable modem’s Wi-Fi network. If you want to use a wired device, simply attach an Ethernet cord between the cable modem and your laptop or computer to establish an internet connection.
Open the web browser on your device, and it should automatically redirect you to the registration page. If not, check your documentation for this link. Finish your registration here to fully activate your cable internet service.
How to Self-Install Fiber Internet
Fiber internet uses fiber optic cables to relay information with light signals directly to and from your internet provider. This method makes fiber internet connections lightning-fast. However, they are also relatively new, so fiber infrastructure isn’t as extensive as some other connections, and self-install isn’t always an option with some internet providers. Before you get started installing fiber internet, you need to make sure you have the necessary infrastructure in your home. Otherwise, even if fiber is available to you, you might require a technician to set up equipment or run additional wiring to make your fiber dreams a reality.
|
Self-Installation Insights: Some internet providers require you to wait until after a specific time on your service date (usually 2 p.m. or so) before activating your home network to ensure everything is set up and ready on their side. |
The main instrument you’ll need in your home is an Optical Network Terminal (ONT), sometimes referred to as a “fiber network terminal” or a “fiber jack.” This big blocky piece of equipment is usually mounted on the wall in the corner of a room or your garage.
If you’ve already got an ONT, great! You can self-install your fiber internet. If not, some providers will let you self-install one, but chances are, your provider will send a technician to install one for you, and that could cost you up to $150 for fiber internet. Sheesh! For more information, look into the fiber internet plans offered by major providers like AT&T, Verizon, Google Fiber, and Frontier.
What You’ll Need to Self-Install Fiber Internet
- Optical Network Terminal (ONT): A device that communicates with the internet provider’s fiber network directly using fiber optic cabling.
- Network box: Sometimes called a gateway, this instrument is a combination modem and router that does all the talking between your devices and the fiber network.
- Ethernet cable: This cable looks like an oversized telephone cord and should be included with your self-install kit. If you’re also planning to connect a computer or a wireless router directly to your network box, you’ll need two Ethernet cables. Length depends on your personal necessities, but a five-foot cord is usually suitable.
- Power cord: This cable supplies electricity to your network box.
- Power outlet: You’ll need access to electricity, so make sure an outlet is nearby.
- Computer, smartphone, or tablet: Any device that can connect to Wi-Fi will be suitable for setting up and testing your new fiber network.
Instructions for Self-Installing Fiber Internet

- Find the ONT in your house. It’s typically located in an out-of-the-way area, like your garage, in a corner, or in a closet. Make sure that it’s plugged in and the lights on it aren’t blinking (that means that the ONT is still connected to the network).
- Connect the Ethernet cable to the port labeled Ethernet on your ONT to the port labeled “ONT” on your network box. Each port should be trapezoidal in shape.
- Connect the power cable to your network box, and plug it into a nearby power outlet.
- The lights on your network box will begin blinking. When they turn solid, you’re ready to move on to the next stage. If more than five minutes elapse, and you still don’t have solid lights on your network box, then unplug the network box from the power outlet and plug it back in again. If the problem persists, you may have to call your internet provider’s customer support line.
- Look on your network box for the name and password of its Wi-Fi network.
- Using your mobile device, log on to your Wi-Fi network using the credentials. Optionally, you can connect to your fiber network using a wired laptop or computer by running a separate Ethernet cable between your device and the network box.
- Open your web browser, and it should automatically pull up the internet provider’s registration page to finish registering your account. If the page doesn’t load, check with your provider for the link to finish your registration, if you haven’t done so already.
How to Self-Install DSL Internet
DSL connections use telephone lines to connect to the internet. This fact makes DSL widely available, because just about everybody has a telephone line. The big drawback is that DSL connections are relatively slow.
However, since most houses have telephone infrastructure, self-installation is easy, straightforward, and typically available to most DSL customers. Plus, self-installing your DSL internet can save you $75 or more. AT&T, CenturyLink, and Frontier are just a few DSL internet providers that allow their customers to self-install their internet.
|
Self-Installation Insights: Rather than registering your self-installation through a web browser, many internet providers allow you to preregister using a mobile app, such as AT&T’s Smart Home Manager app. |
Before you start, one important thing to consider is whether or not your household uses wired telephone service. If you do, then you’ll need to install line filters for each telephone in your house. These filters prevent your home telephone signal from interfering with your DSL internet service.
What You’ll Need to Self-Install DSL Internet
- DSL gateway: This device communicates with your internet service provider’s network over telephone lines.
- Telephone wire: This cable is the same wire used to connect telephones to a traditional phone wall jack. It looks like a small Ethernet cable.
- Power cord: This cord should be included with your self-install kit. It provides power to the gateway.
- Power outlet: Sorry, no electricity, no internet. Make sure an outlet is nearby.
- Ethernet cable (optional): If you’re planning to connect your DSL gateway directly to your computer, you’ll need an ethernet cable.
- Computer, smartphone, or tablet: A digital device will be needed at the end of the self-install process to calibrate your Wi-Fi and finish registration of your service.
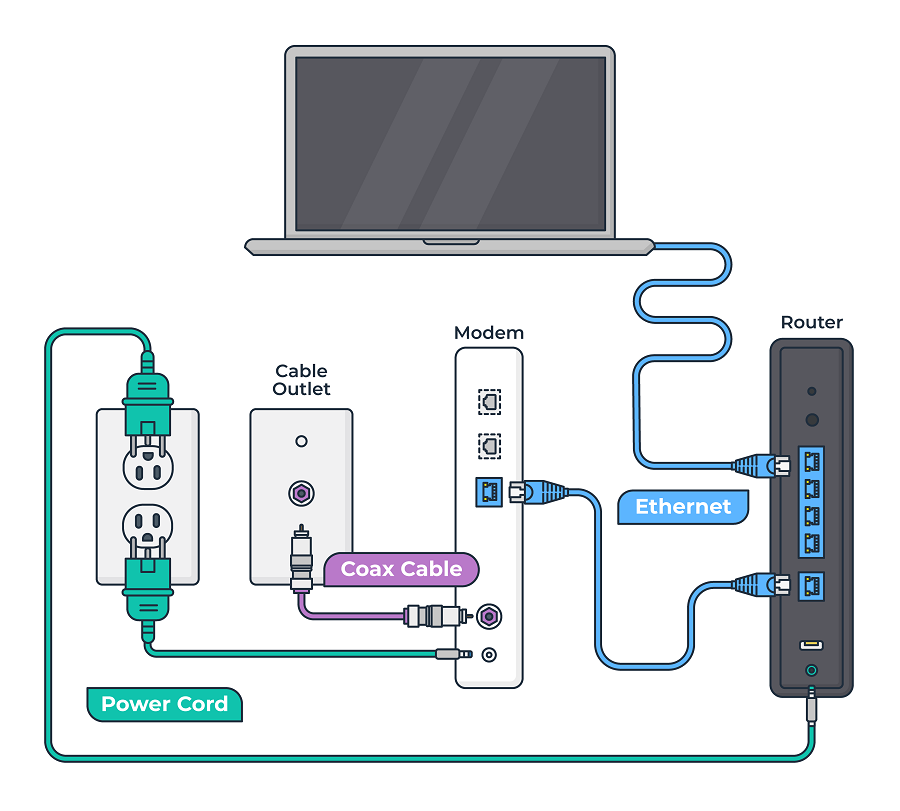
Instructions for Self-Installing DSL Internet
- Connect your telephone wire to your phone jack and the DSL port on your DSL gateway.
- Plug the power cord into your DSL gateway and the power outlet.
- The lights on your DSL gateway should start blinking. When they stop blinking and turn into a steady light, you can move on to the next step. If they don’t stop blinking after five minutes, try the previous step again. Otherwise, you may need to contact your DSL internet provider to ensure your service is ready for activation at your address.
- Locate the name of your DSL gateway’s wireless network and password by checking the side or bottom of the device.
- Connect to your DSL gateway’s wireless network with your smartphone or computer using the supplied information. If you want to use a laptop or computer directly, you can also forgo the wireless network setup and connect an Ethernet cable from your DSL gateway to the device.
- Open any web browser on your device of choice, and it should navigate to the DSL internet provider’s registration page. If it doesn’t go there immediately, find the information included in your self-installation kit or their website. Complete your registration to finalize your DSL internet self-installation.
How to Self-Install 5G Home Internet
The newest type of internet connection is 5G home internet service. Using 5G wireless technology, 5G home internet delivers download speeds exceeding 1 Gbps, similar to what you might get on your smartphone. Self-installing 5G home internet is possible, but it’s more involved than simply turning on 5G on your mobile device.
|
Self-Installation Insights: Unlike other self-installations where calling in for help means you’ll have to pay a technician fee, Verizon offers customers up to 30 days of free 5G home internet setup support in case you need extra assistance. |
As a burgeoning technology, 5G home internet is only available in certain cities and broadband markets. Verizon and T-Mobile are leading the internet provider pack by offering 5G home internet access in select areas. Self-installing 5G home internet service is relatively easy, but the process differs for both Verizon and T-Mobile. To help you get started with this new technology, we’ll cover how to self-install both Verizon and T-Mobile 5G home internet individually.
What You’ll Need to Self-Install Verizon 5G Home Internet
- 5G Home indoor and outdoor receivers: These pieces of equipment receive the cellular signal and transmit it in the form of internet access.
- 5G home router: You’ll require the 5G home router to create your Wi-Fi network with the 5G home receivers.
- Mounting brackets: These brackets hold the 5G home receivers in place.
- Ribbon cable: This wire transmits data between the two 5G home receivers.
- Ethernet cable: Use this cable to attach the 5G home receivers to your 5G home router.
- Power cords: Both the 5G home receiver and the 5G home router require power cords.
- Power outlet: Make sure you have access to power nearby where you want to place the 5G home receiver and 5G home router.
- Window: You need to be able to open the window at least eight inches and have unobstructed access to both sides of the window.
- Window wedges: These wedges will prevent you from accidentally knocking your 5G home internet receivers off the window by opening it too far.
- Alcohol prep pad: Cleaning the window beforehand ensures a secure fit.
- Smartphone: You’ll need a mobile device to download and run the My Verizon app (available on Google Play or the Apple App Store) that guides you through the process.
Instructions for Self-Installing Verizon 5G Home Internet
- Using the My Verizon app on your smartphone log into your account, press Start your 5G Home setup, and then tap Begin setup to start the process.
- Use the app to find the window in your house with the strongest signal.
- Clean the window on both sides with an alcohol prep pad and make sure that you have access to a power outlet nearby.
- Measuring at least three inches from the bottom and side of the window frame, peel off the tape coverings and stick the outside mounting bracket to the outside of the window frame with the key-shaped hole facing up. Press and hold for 30 seconds.
- Attach one end of the ribbon cable to the 5G home outdoor receiver, then while holding the cable, rotate the 5G home outdoor receiver 90 degrees, with the cable pointing to the left. Slide the 5G home outdoor receiver into the center of the outdoor mounting bracket, then turn counterclockwise to lock it in place.
- Repeat steps four and five for the 5G home indoor receiver in the same position and connect the ribbon cable to the 5G home indoor receiver.
- Stick the Velcro strips halfway up the left and right sides of the top window, and attach the included window wedges to prevent the bottom window from opening too wide.
- Close the window, making sure the ribbon cable remains flat at the bottom of the window.
- Plug the power cord into the inside 5G home receiver and into a nearby power outlet and wait 90 seconds for the pulsing white light to become solid during the pairing process.
- Plug in your 5G home router using the included power cord. The light on it should begin pulsing red.
- Press Setup Wired in the My Verizon app to begin your 5G home router setup.
- Plug one end of an Ethernet cable into the inside 5G home receiver and the other end into the red Ethernet port of the 5G home router.
- Connect to your new 5G home internet network using the provided Wi-Fi network name and credentials.
What You’ll Need to Self-Install T-Mobile Home Internet
- T-Mobile High-Speed Internet Gateway: This device communicates with local 5G antennas in your area to get you home internet access.
- Power adapter: This cord provides power to your T-Mobile High-Speed Internet Gateway.
- Power outlet: There needs to be an accessible power outlet near your self-installation location.
- Ethernet cable (optional): You’ll need this cable if you want to connect a wired device to the T-Mobile gateway.
- Smartphone: Use a mobile device to manage your wireless network through the T-Mobile Home Internet app either through Google Play or the Apple App Store.
Instructions for Self-Installing T-Mobile Home Internet
- Identify an ideal location for the T-Mobile high-speed internet gateway that is near a window, has no obstructions, has a nearby power outlet, and is on the upper floor of your home or is at least six feet off the floor.
- Press the On button on the back of the T-Mobile gateway at your preferred spots, and choose the location that has the best signal, represented by the greatest number of bars on the LCD screen on top of the device.
- Set the T-Mobile High-Speed Internet Gateway on a flat surface in this location, then plug the provided power adapter into the gateway and your nearby power outlet.
- Connect to the Wi-Fi network by scanning the QR code underneath the T-Mobile gateway, or by using the information found on that label. Alternatively, you can connect a wired device to the gateway via an Ethernet cord.
- Manage your Wi-Fi network using the T-Mobile Home Internet app and enjoy 5G internet access from home.
Self-Installing Fixed Wireless and Satellite Internet
Unfortunately, self-installation with satellite internet and fixed wireless is not available due to the complexity of the setup process. With both of these technologies, the professional technician has to calibrate the satellite or receiver to ensure there is unimpeded signal access. This fact is rather unfortunate, as fixed wireless internet providers like Rise Broadband charge up to $150 for installation, and satellite internet providers like HughesNet charge up to $300 for professional installation.
That said, the future of satellite self-installation may be on the horizon. Starlink, Elon Musk’s SpaceX satellite internet provider, is now allowing customers in the early phases to install their own satellite internet themselves using the accompanying Starlink app. While preliminary reviews have pointed out the difficulty of choosing an area without any nearby obstructions to the satellite dish, this opportunity could mean big savings for you in the future when it comes to satellite internet installation fees. When we get our opportunity, we’ll give you the step-by-step process for doing it yourself.
Stacking Up the Savings With Self-Installation
By now, we hope this deep dive into the self-installation process for each connection type has shown how relatively easy self-installing your internet can be, as well as how it can save you quite a bit of money. With more and more internet providers offering self-installation as an option, you can take your internet connectivity into your own hands, which offers you more flexibility in terms of internet choice and where you can find additional savings. So, the next time you’re purchasing a new internet plan, go ahead and let them know not to bother sending over a technician because you’ll be doing the installation process yourself.
Frequently Asked Questions About Self-Installing Internet
Does it cost extra to self-install my internet?
While some internet providers charge around $9.99 for the shipping and handling of the self-installation kit, most internet providers provide this self-installation kit for free. Consider picking up this kit yourself from a local store if you want to avoid the shipping and handling fee.
How much can you save by self-installing fiber internet?
You can save $150 or more by self-installing your fiber internet. With Optimum’s fiber internet, you can expect to pay $149.99 for professional installation, while Google Fiber charges up to $300 for their construction fee.
How much can you save by self-installing cable internet?
Save yourself around $100 by self-installing your cable internet service. Both Midco and Cox charge $100 for professional technician installation fees.
How much can you save by self-installing DSL internet?
With DSL providers like CenturyLink and Consolidated Communications charging $75 for technician installation fees, you can save $75 or more by self-installing your DSL internet.
What do I need to self-install 5G Home internet?
Self-installing Verizon 5G Home internet will mainly require you to have the 5G Home indoor and outdoor receivers, a 5G Home router, receiver mounting brackets, and all related power and data cables. Self-install T-Mobile Home Internet with the T-Mobile High-Speed Internet Gateway and the necessary data and power cables. Each provider’s self-installation requires a smartphone or another mobile device to guide the installation process.
Can you self-install fixed wireless internet?
No fixed wireless internet providers at the moment offer a self-installation option due to the complexity of the installation process.
Can you self-install satellite internet?
Major internet providers HughesNet and Viasat don’t allow customers to self-install their own satellite internet service. However, this policy may be changing, as early adopters of Starlink can set up their own satellite internet service by following the directions in the Starlink app.